Easy Fluffy Garlic Knots: Your Fail-Proof Homemade Recipe
Is there any aroma more comforting, more utterly irresistible, than warm bread baking? Add the pungent, sweet scent of garlic to the mix, and you’ve got a culinary magic trick in the making. Homemade garlic knots are a timeless classic, a simple pleasure that elevates any meal. They’re the perfect companion to a hearty pasta dish, a soothing bowl of soup, or simply a snack devoured straight from the baking sheet. However, the journey to perfectly light, airy, and soft garlic knots at home can sometimes feel like a gamble.
Many home bakers dream of that bakery-style fluffiness, only to occasionally end up with a denser, heavier result. If you’ve ever wondered how to achieve consistent, melt-in-your-mouth perfection every single time, you’ve landed in the right place! This recipe for easy garlic knots is meticulously designed to be fail-proof, guiding you through the simple, yet crucial, steps that make all the difference. We’ve tinkered, tested, and tasted to pinpoint the exact sweet spot, the technique that guarantees each bite is soft, wonderfully chewy, and bursting with glorious garlicky goodness. Forget those past disappointments; these knots are so incredibly fluffy, they practically dissolve on your tongue. Be warned: make a batch, and they might just vanish before dinner even has a chance to hit the table!
The Secret to Unforgettable Fluffiness: What Makes These Garlic Knots Special?
The magic of truly great garlic knots lies in their texture and flavor balance. While many recipes promise delicious results, achieving that ethereal fluffiness alongside a rich garlic punch is an art. Our fail-proof method for easy garlic knots focuses on several key elements that ensure a superior outcome:
- Optimized Dough Hydration: The right balance of liquid to flour is critical for a tender crumb. Too little, and your knots will be dry and dense; too much, and they'll be difficult to handle and can result in a gummy texture.
- Active Yeast Management: We don't just add yeast; we ensure it's lively and robust, ready to perform its leavening duty. This means properly warming the water and giving it a quick proof, even if using instant yeast, for absolute confidence.
- Proper Kneading & Proofing: Developing the gluten structure through adequate kneading creates the framework for air pockets, leading to that coveted chewiness and height. Crucially, allowing the dough sufficient time for both its first and second rises (proofing) is non-negotiable for maximum fluffiness. Rushing this process is the enemy of light bread.
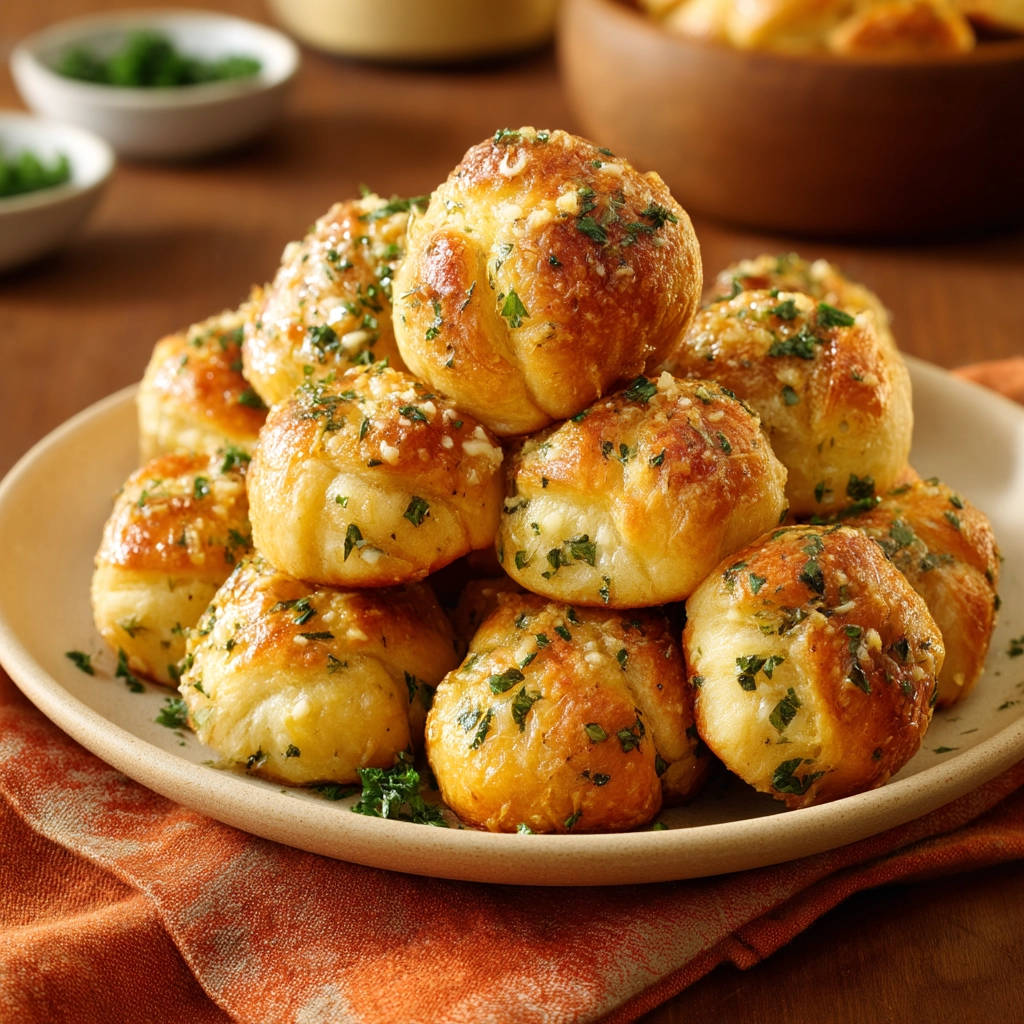
- The Perfect Garlic Butter Ratio: Our topping isn't an afterthought. It's a generous blend of high-quality butter and abundant fresh garlic, designed to seep into every crevice, creating an intensely aromatic and flavorful exterior that complements the soft interior.
This careful combination of simple ingredients and precise technique transforms basic pantry staples into an extraordinary culinary experience. These aren't just garlic knots; they're a testament to how small adjustments can lead to bakery-quality results right in your own kitchen.
Pantry Staples to Garlicky Masterpieces: Your Ingredient Checklist
Creating these irresistible knots begins with a handful of basic ingredients, plus the undisputed stars of the show: garlic and butter. The beauty of this easy garlic knots recipe lies in how these simple components harmoniously come together to create something truly special. Gathering and preparing your ingredients beforehand (mise en place) ensures a smooth and stress-free baking process.
For the Dough:
- Instant Yeast: The workhorse of our dough, instant yeast is incredibly convenient as it often doesn't require separate proofing. However, for guaranteed lightness and peace of mind, we'll give it a quick "wake-up call" by blooming it briefly in warm water. This ensures it's active and ready to make your knots beautifully airy.
- Warm Water: Absolutely crucial for activating the yeast. Think of it like a cozy bath for the yeast – around 105-115°F (40-46°C). Water that's too hot will kill the yeast, while water that's too cold won't activate it, leading to a flat, dense dough.
- Granulated Sugar: This isn't just for sweetness; it's vital food for the yeast, helping it to become active and thrive, which in turn contributes to a faster rise and a more tender crumb.
- All-Purpose Flour: The structural backbone of our bread. While bread flour can be used for a chewier texture, all-purpose flour provides a wonderfully balanced and fluffy result perfect for knots.
- Salt: Don't skip the salt! It's a flavor enhancer, balancing the richness of the dough and the garlic butter, preventing the knots from tasting bland. It also helps control yeast activity.
- Olive Oil (Optional, but Recommended): A tablespoon or two added to the dough can significantly enhance its tenderness and adds a subtle, pleasant richness.
For the Iconic Garlic Butter Topping:
- Unsalted Butter: The perfect base for our aromatic topping. Melted, it becomes a brushable liquid that infuses every part of the knot with rich flavor. Using unsalted butter allows you to control the overall saltiness.
- Freshly Minced Garlic: This is non-negotiable. The vibrant, potent flavor of fresh garlic is vastly superior to pre-minced jarred varieties, which often have an acidic, less authentic taste. We're aiming for that unmistakable, robust garlic presence!
- Finely Chopped Fresh Parsley: More than just a garnish, fresh parsley adds a bright, herbaceous note that beautifully cuts through the richness of the butter and garlic. It also lends a lovely pop of color, making your knots as appealing to the eye as they are to the palate.
- Garlic Powder (Optional): For an extra layer of garlicky depth, a pinch of garlic powder can be added to the butter mixture, creating a more complex flavor profile without overpowering.
- Grated Parmesan Cheese (Optional): A sprinkling of finely grated Parmesan, added to the butter or right after brushing, introduces a savory, salty tang that complements the garlic magnificently. It's a fantastic addition for true carb lovers!
With these simple, high-quality ingredients, you're well on your way to crafting the fluffiest, most flavorful easy garlic knots you've ever tasted!
Step-by-Step: Crafting Your Easy Garlic Knots (The Fail-Proof Method)
Ready to turn those humble ingredients into warm, fluffy masterpieces? Follow these steps carefully, paying close attention to the cues your dough gives you. This is where the magic happens and where you'll understand why this truly is an easy garlic knots recipe.
- Activate the Yeast: In a large mixing bowl (or the bowl of your stand mixer), combine the warm water and sugar. Sprinkle the instant yeast over the top. Stir gently, then let it sit for 5-10 minutes. It should become foamy and bubbly, indicating the yeast is active and alive. If not, your water might have been too hot or cold, or your yeast expired – start again!
- Mix the Dough: Add the flour, salt, and olive oil (if using) to the yeast mixture. Using a wooden spoon or the dough hook attachment of your stand mixer, mix on low speed until the ingredients come together to form a shaggy, somewhat sticky dough.
- Knead for Structure: Turn the dough out onto a lightly floured surface (or continue with your stand mixer). Knead for 7-10 minutes until the dough is smooth, elastic, and no longer sticky. It should spring back when lightly poked. This step is crucial for developing the gluten, which gives your knots their soft, chewy texture.
- First Rise (Bulk Fermentation): Lightly grease a clean bowl with a little olive oil. Place the dough in the bowl, turning it once to coat. Cover the bowl tightly with plastic wrap or a damp kitchen towel. Let it rise in a warm, draft-free place for 60-90 minutes, or until it has doubled in size. Patience here is key for superior fluffiness! If you're looking for even more insights into achieving that perfect soft and fluffy texture, explore The Best Soft & Fluffy Homemade Garlic Knots Revealed.
- Shape the Knots: Gently punch down the risen dough to release the air. Turn it out onto a lightly floured surface and roll it into a large rectangle, about 1/2-inch thick. Using a pizza cutter or sharp knife, cut the dough into strips about 1 inch wide and 6-8 inches long. Take each strip and tie it into a simple overhand knot. Arrange the shaped knots on a parchment-lined baking sheet, leaving some space between them.
- Second Rise (Proofing): Cover the baking sheet loosely with plastic wrap or a clean kitchen towel. Let the knots rise again in a warm place for another 30-45 minutes, or until they look visibly puffy and have increased by about 50%. Preheat your oven to 375°F (190°C) during this time.
- Bake to Golden Perfection: Bake the knots for 12-18 minutes, or until they are golden brown and cooked through.
- Prepare & Apply Garlic Butter: While the knots are baking, melt the unsalted butter. Stir in the minced fresh garlic, fresh parsley, and optional garlic powder/Parmesan. As soon as the knots come out of the oven, brush them generously with the hot garlic butter. The warm bread will absorb the delicious flavors beautifully. For a deeper dive into replicating that authentic Bakery-Style Fluffy Garlic Knots: Simple Steps for Garlicky Perfection, check out our detailed guide.
Serve your warm, fluffy, garlicky knots immediately and watch them disappear!
Pro Tips for the Fluffiest, Most Flavorful Easy Garlic Knots Every Time
- Listen to Your Dough: Don't always stick rigidly to times. If your kitchen is cooler, your dough might need longer to rise. If it's warm, it might be faster. Look for visual cues like doubling in size or puffiness.
- Don't Over-Flour: When kneading or rolling, use as little extra flour as possible. Too much flour will make your knots dry and dense. A slightly sticky dough is better than a stiff one.
- Fresh Ingredients Matter: Especially for garlic and parsley. The difference in flavor between fresh and jarred/dried is immense.
- Embrace the Knead: Proper kneading develops gluten, which is essential for texture. If you're new to baking, watching a quick video on dough kneading techniques can be incredibly helpful.
- Customize Your Topping: Feel free to experiment! Add a pinch of red pepper flakes for a subtle heat, or sprinkle with a blend of Italian herbs.
- Storage & Reheating: These easy garlic knots are best served warm, straight from the oven. If you have leftovers (a rare occurrence!), store them in an airtight container at room temperature for up to 2 days. To reheat, wrap them loosely in foil and warm them in a 350°F (175°C) oven for 5-10 minutes until soft and warm again.
There's nothing quite like pulling a tray of homemade, golden brown, aromatic garlic knots from the oven. This recipe for easy garlic knots is truly a game-changer, designed to remove any apprehension you might have about baking bread. With clear instructions and helpful tips, you're now equipped to create fluffy, flavorful garlic knots that will earn you rave reviews and disappear in a flash. So go ahead, gather your ingredients, follow these simple steps, and prepare to fill your home with the intoxicating aroma of freshly baked, garlicky perfection. Happy baking!
